Pages

August 20, 2010

Who NOT to follow

Share on Facebook


imageRight after I posted a blog on GreaseMonkey, I read Janakiramm vent his frustration on Facebook about how Twitter is mimicking Facebook. Twitter has recently started “Who to follow” section on its site where is suggests people you should be following. Its not only irritating but badly implemented too as the same names keep appearing repeatedly. Its ok for sites to implement new features but they should allow the user to disable it. The least they could do is let user specify “I do not know anyone from here”. For people like Janakinamm and me who probably prefer a clean interface (I think I have Interface OCD), GreaseMonkey can be of help. Install GreaseMonkey (if you don’t have it already) on Firefox (Download it if you aren’t using it) and lets fix the Twitter problem.

Who NOT to follow

If you are ready and armed with Firefox and GreaseMonkey, just head over to this link Remove Who to follow (Twitter) and click on the Install button (If you also have GreaseFire add-on then you can simply right click on GreaseMonkey icon and Click on “xx scripts available”and search in the GreaseFire window. Check my previous post on how to do that).

image

Once installed, simply refresh your twitter and Voila! Who to Follow is gone.

image

Seriously, if you haven’t got Firefox and GreaseMonkey yet, go get it now. It will reduce clutter and irritation you might be having with your favourite sites.

Happy Tweeting Smile

August 19, 2010

Quit monkeying around and take control of the web

Share on Facebook


Web based applications are cool as you don't need to download software, maintain and upgrade them. However, web applications tend to target lowest common denominator of web standards as browsers have varying capabilities limiting the richness in User Interface.

As a user, one of the first things I do when I install any desktop software is rush to the Tools > Options menu to figure out what customization possibilities does it provide. It kind of gives you an inkling about the capabilities of the product and also richness of its UI. Most web apps lack extensive customization and hence GreaseMonkey.

What is GreaseMonkey?

icon-medium1GreaseMonkey is an add-on for Firefox browser which extends the capabilities of web sites in imaginatively endless ways. It basically works on the content Firefox receives from a web site and can rearrange, remove, add elements from the contents using small bits of JavaScript. There are thousands of readymade free scripts available which you can use as they are or even go an tinker with them to customize them to suit your needs.

Installing GreaseMonkey

GreaseMonkey is a add-on for Firefox browser, so head over to https://addons.mozilla.org and search for GreaseMonkey.

image

Click on Add to Firefox button and once installed, restart Firefox. Nothing spectacular happens as of now, just a small icon appears in the status bar.

image

What does it do?

Well, basically by itself.. nothing. Its an engine and host for fantastic user scripts which can completely transform websites without any help from the website itself. This can range from eliminating parts of the web page (like irritating ad sections) to rearrange elements (move Gmail chat from left to right) to completely skin the page (Better Gmail). The possibilities are endless. So let’s get some scripts. All these scripts are not written by the creator of GreaseMonkey but countless developers and even end users. Thankfully, rather than searching all over the web for these scripts, there is a central site called UserScripts.org which hosts these scripts and even allows you to install them in one click. Lets see what we can do with these scripts. We will take a list of popular websites and apply some GreaseMonkey Scripts.

Lets take a look at some sample sites and scripts.

Google FX

Let try a sample GreaseMonkey script on one of the most used sites – Google. GoogleFx is a GMScript which totally transforms Google home page and search page to add a set of useful functionality. The script is located at http://userscripts.org/scripts/show/31950.

image

Click on Install and it will pop up a dialog box giving you details of the script. This includes a short summary, sites the script runs on and even the option to view the Script source. All GMScripts are available in source form which is comforting as you can view the source to see if everything is above board and also becomes a source to learn JavaScript in case you want to write your own scripts.

Once you have installed the script, it will show up in the GreaseMonkey configuration. You can disable/enable/uninstall the script whenever you want. While the author of the script specifies which web sites it runs on, you can add more sites (e.g. Google.co.jp) or put certain sites in exclusion list (Google.co.in).

image

SNAGHTML18cfecf[5]

Having installed the script, now lets head to Google and see what this script does. Remember, these changes are not coming from the server but happening locally AFTER the page contents are received by Firefox.

SNAGHTML18fde74

As you can see that the script has changed the look and feel of the main Google page. (Click on the image above to see a bigger preview). The links on the top are now tabs with icons, there is a colour theme chooser at extreme right. FX has also added its own preference Icon “Fx” so that you can customize what you like.

The search page has also been modified. Don’t be taken aback with the amount of information. Most of it is actually quite useful and if you don't like something, you can always customize it to remove the options you don’t like. Some of the things this script does

  • You can switch between tabs (Web, Images, Video etc.)
  • The scrolling is auto paging.. just keep scrolling down
  • Select time ranges (last hour, day, week month)
  • Switch search engine (Bing, Ask, AllTheWeb..)
  • Displays related searched on top right prominently
  • Displays Wikipedia articles if any
  • Display Twitter, YouTube, Maps, Books etc.
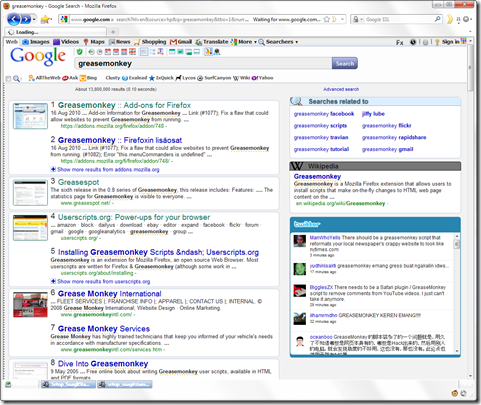
SNAGHTML1a05661

Don't like it? No worries.. Just right click GreaseMonkey in status bar,uncheck GoogleFx from the popup menu and refresh your page and everything will be back to normal. No need to uninstall or restart the browser.

Here are some more popular sites “Before” and “After” photographs Smile

GoogleReader

Google Reader is online RSS aggregator and reader which has the standard look and feel of Google

image

When applied with Mac OSX SnowLeopard skin available on  http://userstyles.org/styles/16900 transforms the site to mimic OSX look and feel.

image

GreaseMonkey scripts are on userscripts.org but userstyles.org is the home for another Firefox add-on called Stylish. Stylish scripts are compatible with GreaseMonkey and hence can be loaded by GreaseMonkey without requiring Stylish add-on.

BetterFaceBook

This one is my favourite as I got sick and tired of all the StupidVilles (FarmVille, PetVille, FishVille) and Notifications like “So and so has become a friend of so and so or joined this or that group, which used to fill my news feed. BetterFaceBook script allows you to control virtually any aspect of Facebook. Just follow this link to install GreaseMonkey script for Facebook http://betterfacebook.net

Who is going to spend so much time searching scripts?

I agree.. While the scripts can do amazing things, who has the time to wade thru thousands of scripts on userscripts.org and userstyles.org? How about this scenario – You visit a website and somehow GreaseMonkey could tell you how many scripts are available for that site, their popularity, rank by downloads AND allow you to install the script right there in Firefox? Sounds great? Well, then what we need is another Firefox extension called GreaseFire. It adds a menu item to GreaseMonkey menu indicating the number of scripts available for the site.

image

The image shows that there are 32 scripts available the current site and clicking it brings up a dialog box which lets use browse, preview and install the script with a single click.

image

But what about other browsers?

GreaseMonkey was developed Primarily for Firefox given its extensible architecture and pluggable add-ons. The testimony for GreaseMonkey is that many sites actually implemented the features GreaseMonkey script tired to add on client side (e.g. Right click preview in GMail).

Google Chrome

GreaseMonkey creator Aaron Boodman now works at Google and has added GreaseMonkey capabilities to Chrome natively. This means that most of the 40,000+ scripts can be added directly to Chrome without having to first install any add-on. Chrome directly converts GreaseMonkey script into Chrome Extension (.crx).

image

IE, Safari and Opera

While GreaseMonkey was created for Firefox and now the creator has added native support for Chrome, there are other ways it is possible to run GreaseMonkey script with varying degree of success in browsers like IE, Safari and Opera. Check them out here.

Conclusion

GreaseMonkey is one of the most popular Firefox add-on and has amazing abilities to transform web sites in their look & feel as well as functionality. I am sure you will explore, browse and try out GreaseMonkey scripts, if you like any drop me a mail or a comment on this post.

Happy Monkeying Smile

August 16, 2010

GMail tricks

Share on Facebook


Gmail


I am sure many users are aware of this:
GMail ignores . (dot) in the userid part of the email id
so first.last@gmail.com can be written as
- firstlast@gmail.com
- f.i.r.s.t.l.a.s.t.@gmail.com
- .......first......last.....@gmail.com


GMail allows extra characters to be added to the userid part of the email id
so first.last@gmail.com can be written as
- first.last+funny@gmail.com
- first.last+imp@gmail.com

This allows us some interesting possibilities.

A. Control SPAM
imgresWhen registering on sites which is one off, try using first.last+once@gmail.com. The confirmation mail will get delivered once and thereafter you can direct all emails on this ID to the spam folder


B. Discover who sells your email id to spammers
imgresWhen registering on sites where you expect notifications or useful responses, try putting the sites name in the userid part, e.g. first.last+facebook@gmail.com. Now you should be getting notifications from Facebook only. If you start getting mails from site offering to enhance you-know-what, you will know who shared your email id with spammers.

C. Create GMail Filters with Labels
imgresGMail allows 7GB of email space but does not have concept of folders. It has something better.. Labels. A Label is a tag which can be applied to any mail and multiple labels can be applied. You can apply labels manually or automatically using filters.

imgres1. For example, you need to remind yourself of something important, send yourself a mail first.last+IMP@gmail.com. Now in GMail > Setting > Filters > Create Filter > To: first.last+IMP@gmail.com > Next > Apply Label > IMP. You can also specify colour to the Label.. like Bright Red. Now whenever you send yourself a mail on first.last+IMP@gmail.com, it will appear in your inbox with a Label called IMP in bright red.

todo2. Another trick is to create a filter from: first.last@gmail.com to: first.last@gmail.com and apply label TODO. This way you would have a list of pending tasks showing up in your inbox. From the labels list you can click TODO and it will show a list of all pending task. Once you have completed the task, open the mail and remove the label by clicking on the X sign on the top of the mail.

imgres3. Many a times we search for attachment of specific type and have to wade thru thousands of email. At best we can try and recollect some words which were there in the mail containing that presentation and search for it. A better way would be to create a filter to apply specific label based on the attachment. e.g. You can create a filter PPT and specify in the filter that the attached file extension should be .ppt or .pptx. This way you can categorize PPT, MUSIC, PIC etc.

Another advantage is that you can limit your search to a specific category. You can click label PPT which shows only those mails which are labelled as PPT and then search for Budgets.
Filters are very powerful but unfortunately underutilized feature of GMail. It even allows you to export and import filters, so that you can exchange your filter with other users or re-use them in your alternate Gmail ids.

Do you have any interesting filters which you think are interesting and useful? Drop me a line

August 12, 2010

Aero Effect in browsers

Share on Facebook


image

People have been asking me how I am able to get Aero effect on browser like Chrome after they saw the screenshots in the previous post). I kind of like the transparency effects in Windows 7, especially the change from Vista where maximizing the window no longer makes it title bar opaque. While transparency is built in and automatic for some applications, you need to tweak or even install add-ons and utilities to bring transparency in some applications.

Enabling Transparency

First of all you need to enable Aero in your Vista or Windows 7 by going to Desktop > Right Click > Personalize menu and choosing “Enable Transparency”. I tend to choose the lightest colour (Frost) for Windows borders, start menu, and taskbar. It gives almost clear glass like transparency effect. You can also adjust the colour intensity which will adjust the opaqueness of your title bar. Least intensity will make it look like clear glass whereas max intensity will make it look like frosted glass. Once you are done with adjusting aero, we can start looking at applying aero capabilities to various applications.

image

Transparency in browsers

I use 4 browsers for testing – Firefox, Chrome, Internet Explorer and Opera. Each of these browser requires a different method to make their toolbars transparent.

  • Internet Explorer – Built in transparency with Windows 7
  • Opera – Transparent skins available for download
  • Firefox – Add-on available for making the toolbar transparent
  • Chrome – Hacking the theme to convert the toolbar transparent

Lets take a look at each of these one by one.

Opera 10.x

Opera, like many other applications, has the concept of skin (theme). All you need to do is browse online themes from Opera menu and apply a glass or transparent theme. Opera comes with 2 built in themes – “Opera Standard” and “Windows Native”. While Windows Native provides standard windows colour to the toolbar.

image

Opera Standard applies glass effect to the tab area as well.

image

Applying Opera Standard Theme by itself give you transparency effect on Opera toolbar but if you want to extend it, there are a number of transparent theme available which can make the tabs and even empty page totally transparent. To browse and install these themes, go to Opera Menu > Appearances > Skins. Click on “Find more skins” radio button and browse for skins online.

image 

Applying this skin makes the ENTIRE opera transparent, but don't worry, its only for the blank page and not when you open web sites Smile

image

Firefox 3.x

Firefox is the most customizable browser out there and you don’t have to rely only on Mozilla to provide you with the feature you are looking for, you can browse thousands of add-ons available on the site and you are most likely to come across an add-on which satisfies your requirement. In this case, and add-on called “All Glass” which can be applied to Firefox to make its toolbar glassy like Internet Explorer or Opera. To install, go to Tools > Add Ons > Get Add Ons > Search for All Glass.

image

When you find it, click on the Add on name and select “Add to Firefox”. You will be instructed to Restart Firefox for the add-on to have the effect.

image

Restart and Voila! Your Firefox is all glass now.


Chrome 5.x

Chrome is the trickiest of the lot to glassify. Though if you were to search for Transparent themes, you will find them on Google site and these themes even show the white/gray square indicating transparent background (as depicted in PhotoShop/Gimp and other editing product). If you excitedly apply the theme hoping that the gray/white areas will be transparent, well.. they will be gray and white.

image

image

Chrome installs extension and themes and stores them under User profile. The theme contains a JSON file which specifies the theme attributes. It takes a simple micro surgery to remove the frame attributes altogether forcing Chrome not to apply ANY colour to its frame, leading to transparency.

First apply a theme you would want before making rest of the toolbar transparent. Having done that, lets find out where Chrome stores its theme attributes. To do this on Windows 7 you need to go to \Users\<YourLoginName>\AppData\Local\Google\Chrome\UserData\Default\Extensions as shown in the image below.

image

These are all the extensions that have been installed in Chrome. Unfortunately, Chrome does not use the extension name for the directory name making it difficult to figure out which extensions these are and more importantly, which of these directories is the theme directory. You need to search the directory which contains a folder called “i” and that’s the one in which we are going to modify the attributes. For me, its located in this folder

image

Now, edit the JSON file using any text editor and knock off the lines referring to the frame. For example, my current theme specifies:

image

We are going to take this modified extension and create a new theme (extension) out of it. So save the file and copy the version number folder (1.0_0)  to another location, say on desktop. Next, in Google Chrome, go to Menu > Tools > Extensions. Make sure the developer mode is on and click on pack extension to create an extension file (.crx).

image

This will generate a file on the desktop 1.crx. Now just drag and drop the file anywhere on Chrome. Chrome will give a warning at bottom of its window that installing extension can be harmful.. blah.. blah. Just go ahead and click on continue.

image


And Voila!

image

Conclusion

Most applications either support transparency naturally or have tweaks and extensions to achieve it. There are 3rd party apps which are capable of applying transparency to any application, but the don't do it selectively, rather to the entire window.. which is not what you may be looking for.

Happy Glassing Smile

August 11, 2010

Breadcrumb your Firefox address bar

Share on Facebook


image

For most people a URL is merely an encoded string to access a page on the web, but for techie its like a treasure trove. You can glean out a lot of information by looking at the URL itself like whether is a TLD (Top level domain) or ccTLD (country specific domain). Which web platform it may be using (.asp, .aspx, .jsp) and the various other components like parameters. Sometimes the URL is hierarchical like site.com/archives/2009/09/01.aspx indicating classification. You may have landed up on the site thru some link but one look at the URL and you know that you can probably get more info from the site by merely changing relevant parts of the URL.

Editing the URL to get to other pages

However, editing such URL is a pain as you have to select the end part of the URL and backspace till you get to the part you want to change. E.g you may have landed up on a URL like this one http://www.crunchgear.com/2010/08/10/mad-at-google-the-question-is-are-you-mad-enough-to-stop-using-it-can-you-even-stop-using-it/ and you can probably spot that this site classifies it by year/month/date/article. Now you suspect that you can find more posts if you could delete the last part of the URL. But as shown in the image, it can be tedious to backspace on the URL to clear a whole bunch of stuff to reach the previous segment of the URL.

image

Breadcrumbs in Firefox

Firefox has an add-on called the LocationBar2 which converts the URL inside the addressbar into breadcrumbs (much like Windows explorer paths in Windows 7). It helps immensely in accessing other parts of the URL and navigating up the URL path. Download and install the add-on from Mozilla site and lets configure it to provide us URL crumbs. Adding an add-on to Firefox if easy.. go to Tools > Add-ons  and click on Get Add-ons tabs. Type the name of the add-on you are looking for.. when it comes up, click on it and select “Add to Firefox”. Once installed, it will prompt you to restart (I like the fact that Chrome doesn't ask you to restart browser when an extension is added, but then Chrome extensions don’t integrate as deeply as some of the FF add-ons do). The alternative is to visit https://addons.mozilla.org/en-US/firefox/addon/ and search or browse for the add-ons you want.

image

Notice the green arrows in the URL bar after installing LocatioBar2, they create clickable segments. You are currently looking at the original URL, but you can click the segment of URL which is “10” and probably signifies the archive date. Similarly you can click “08” for the monthly archive or “2010” to see the yearly archive. This of course would only work with those sites which use such hierarchy.

image

image

image


As you can see from the images, you can click different segments of the URL and move up to different parts of the website.

LocationBar2

imageLocationBar2 has simple configuration. First of all, it allows you to hide protocols which are common and obvious, like http and https. You can add more like ftp if you like. It also has ability to show or hide to GO button inside the addressbar but most people I know simply press ENTER or CTRL-ENTER after typing the URL.

The gray subdomain option allows the domain name to be in regular colour while the subdomain in gray thereby highlighting the domain in the URL. I tend to even choose a different colour and make it bold (strong) so that with one look you can make out clearly which domain you are on.

Now comes the important part. As LocationBar2 can provide Linkification, it allows allows an option to select the original URL with click or double click. However, as it breadcrumbs the URL into segments, click will select segments and not the entire URL. What if you want to copy the entire URL to paste elsewhere? In the Linkification tab it has options for “On top” and “On Bottom”. If you select “On Bottom”, the moment the mouse crosses over the lower border of the addressbar, the URL will become  segmented, so to get URL in normal format, uncheck “On Top”. Now if you move you mouse over the top edge of addressbar and bring it back inside, the URL will become regular link and you can click or double click to select it.

Finally, the breadcrumbs can be for the entire host (domain and the rest) or for each segment. Apart from being able to navigate up and down on the URL, I also use it go quickly go “home” on any site. For example, I click the domain segment on facebook.com to quickly go back to the main page or click on mail.google.com in my gmail to reload gmail instead of just going back to inbox. I think LocationBar2 add a very useful feature to Firefox and makes URL navigation a breeze. Go ahead and give it a try.

Happy Breadcrumbing Smile